Sunday, January 9, 2011

DECORATIVE ICE CREAM MADE BY FOAM

0 Comments


Required item:

1.brown,dark pink, light pink, yellow and brown fun foam.
2.pink, white, yellow and brown dimensional paints and glitter.
3.glue for fun foam.

Instructions for ice cream cone:

1. Print out the Ice Cream Cone Template and trace around each marking with a pencil. Turn the paper around and you should be able to see the markings through the paper. Now place the paper over the appropriately colored sheets of fun foam and retrace the markings you see onto the foam. Cut out the pieces.
2. To make the sparkly cones you will then use the dimensional paint to decorate the ice cream in the appropriate color. On the cone you can create a waffle look by first drawing stripes parallel in one way and then drawing stripes perpendicular to these.
3. Sprinkle same color sparkle over the dimensional paint outlines and tap off the excess glitter. Let the paint thoroughly dry.
4. Once dry, you can glue the top of the ice cream to the bottom cone piece.

TISSUE PAPER CARNATION FLOWER

0 Comments


You will need:
  • Tissue paper
  • Scissors
  • 2 large paper clips
  • Pipe cleaners (chenille stems) or floral wire
  • Coloured marker pen
  • Optional: floral wire, floral tape, wire cutters

How to do it:

1.You can make your carnations any size, but I found that a 3″ (7.5cm) circle gives a realistic-sized flower. Fold your tissue paper in half again and again until it is just larger than your circle size. I used a 20×24″ sheet of tissue paper, which let me cut 48 circles at once – enough for 4-5 carnations!

2.Find a suitably-sized circular container and draw around it with a pencil onto your folded tissue paper. 
 
3. Start to cut out the circle, holding all the layers of tissue paper together. If you can’t cut through the whole thickness, try cutting half the layers at a time, then draw another circle to cut out the other half. I found that I could cut through 48 layers with no problem, as the tissue paper is so thin. You don’t have to cut too exactly, so don’t worry if some of the layers don’t come out as perfect circles. Use a large paper clip to help keep the layers together.


4. As you continue to cut, add a second paper clip on the opposite side of the circles to keep all the circles together.


5. This next step is the key to making the flowers look more realistic than standard tissue paper flowers.


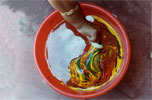
6. Take a marker pen with a complementary colour (a cheap kids’ pen is fine). A bold colour will give a more effective result. Use your non-writing hand to hold the edges of all the tissue-paper layers together, and use the side of the pen nib to begin to gently colour the edge of the circles.


7. Take this slowly – if you press too hard, the tissue paper layers will separate. Colour a small section of the edge at a time, and go over each section a few times to ensure the colour is intense and the ink has saturated all the edges.


8. Continue to colour around the edge. When you are about halfway through, move the paper clips to areas you have already coloured, and fill in the gaps.9. You may well end up with a coloured finger by the time you have finished , as you have to hold the papers close to the edge to keep them together while you colour them! Don’t worry – it’ll wash off .


10. Remove the paper clips and select enough circles from the pile to make one flower. I used approx 12 circles per flower, but 8-10 circles would be fine.


11. Keep these circles together and poke two holes near the centre of the circles. I used the end of a pipe cleaner to do this, but if your pipe cleaners aren’t sharp enough you could use a large needle or similar.


12. Fold down about 1 inch of the pipe cleaner, and push the long end through one hole and the short end through the other hole.


13. Pull the ends all the way through, then twist the ends of the pipe cleaner together underneath the flower to keep all the circles together:


14. Now to make the petals. Separate the topmost circle and crumple it upwards from the centre. Scrunch up the paper randomly, but try to concentrate on the base of the petal (the centre of the circle) and leave the coloured edges alone.


15. Now repeat with each circle in turn. Crinkle each circle up individually, and try not to have the folds in the same place each time.


16. Keep scrunching… When all the circles have been crumpled up, you will end up with a lovely carnation like this:


17. Make a double-headed stem by cutting down one pipe cleaner to half its length (use wire cutters for this) then twisting it together with another completed stem: 


18. Cut the floral wire to the same length as your stem.


19. Holding the wire and pipe cleaner stem together, start to wrap the floral tape tightly around them. Start about 1″ down from the flower head (below, left) and wrap up the stem to the head. Then wrap all the way down the stem to the bottom. To wrap without the tape getting tangled up, hold the tape steady and at an angle to the stem with one hand (below, right), and use your other hand to twirl the stem around, winding the tape around itself as it goes.


20. The floral tape will stick to itself, so there is no need to use glue to fasten it down. Remember to stretch the end of the tape as you wrap the end of the stem, to help it to stick securely.


21. Make just one as a paper buttonhole. Make about a dozen, and you have a beautiful bouquet!


22. I hope you enjoyed this tutorial! If you make any tissue paper flowers.

CREPE PAPER FLOWER

0 Comments


Things You'll Need:
  • Crepe paper
  • Ruler
  • Scissors
  • Green pipe cleaners

Instructions:


  1. Stack five sheets of crepe paper on a flat surface. You can use the same colored crepe paper throughout this project, or you can layer different colors for a unique look. Work in a well-lit area so that you can see what you are doing.
  2. Measure an 8-by-8-inch square of crepe paper with your ruler and cut all the layers with your scissors. This is a great activity for children, but supervise them when they are using scissors.                 Make a 1/2-inch fold in the stack of crepe paper. Run your finger along the fold to create a crease. Hold the new fold tight and flip the crepe paper over. Fold the crepe paper you are holding backwards to create a second fold. This is called an accordion fold. Continue in this manner until you reach the end of the crepe paper.
  3. Fold the crepe paper in half by bringing the two short ends together. Do not make a full fold or crease. You are looking for the center of the paper.Cut a tiny V-shape on each side of the fold.
  4. Wrap one end of a green pipe cleaner around the middle of the paper (where you made your tiny cuts) and then twist it around itself where the pipe cleaner meets the underside of the flower. This will secure the pipe cleaner stem to the crepe paper flower. The long end of the pipe cleaner should be pointing down.          
  5. Pull the ends of the crepe paper up, and then begin to open the layers inside by pulling them out gently. Work with the layers, pulling and lifting them, until you are satisfied with the look of your flower.

POTTERY PAINTING

0 Comments


Things you will need:
  1. A clay pot,
  2. suitable paints in various colours (we usually just use poster paints),
  3. small paintbrush,
  4. a container with clean water,  
  5. lots of newspaper to save your table from being painted.
  
Instructions:
 1.  Wash the clay pot in warm soapy water to remove any traces of dirt or grease.
   
2.Cover the table or painting area with newspaper, find paints, paint brushes and a mug of clean water (to clean the paint brushes when swapping colours).
   
3.When the pot has dried, start painting whatever design you like!

4.Ensure each layer of paint dries thoroughly before adding another colour on top.

5.Allow the painted flower pots to dry out.
And hey presto! you have delightful one-of-a-kind painted claypot!                                                                                

Tips:
Since clay pots are porous, they do dry out very quickly by themselves, but to hasten the process, pop them on top of a radiator, on a sunny window ledge or in the cool oven of an Aga or Rayburn.

RAINBOW POT PAINTING

0 Comments

                                                                                                        
Materials Required :
  • Enamel Paints (Different Colours)
  • Brush
  • Water
  • Container
  • Earthen Pot
Procedure : 
  1. At first, colour your earthen pot with any enamel paint.
  2. Now take a container containing three-fourth quantity of water and spill different colors of enamel paints into it.
  3. The different colour paints float on the water.
  4. Now gently hold your painted pot at its edge and dip it into the water and twist it around, in the water and slowly take it out of the container.
  5. Keep the pot aside without disturbing it.
  6. The wet paints will slowly take its own design and shade.
    Wait till the pot dries.
  7. Your pot painting is ready.