Friday, January 7, 2011

ROSES MADE BY COFFEE FILTER PAPER

0 Comments

Paper Roses
Tools and Materials:

1.Box of disposable cone coffee filter.
2.Scissors  .                                                                                                    3.16-gauge floral wire.
4.Floral tape.
5.Water color paint.
6.Flat brush.
7.Bamboo skewer.
8.Glue stick.

Coffee Filter Roses How to do it: 

1. Trace and cut petal shapes through both layers of filters, as per templates.
2. Form rose. With coffee filter No. 1, take four connected petals and poke an 18-inch length of 16-gauge floral wire down through the center of the bottom of one end petal so 1/2 inch of the wire remains sandwiched between two opposite petals.
3. Wrap adjacent two petals tightly around first two petals; wrap with floral tape around base, then 1/2 inch down wire, to secure.
4. When working with floral tape, pull it as you work to expose the sticky part of the tape.
5. With coffee filter No. 2, take four connected petals and sandwich "flower bud" between two opposite petals. On the adjacent petal pair, gently tear the perforation of the base so that you have a strip of 2 side-by-side petals. Wrap this petal strip around the other two petals and secure with tape.
6. With coffee filter No. 3, take four connected petals and gently tear the perforation at the base to create a strip of four petals. Wrap this petal strip around flower bud and secure with tape.
7. With coffee filter No. 4, gently tear the perforation at the base of petal shapes to create a strip of five petals. Wrap this petal strip around flower bud and secure with tape. (The folded petal gives rose stability and a more rounded form.)
8. With coffee filter No. 5, place three petals, overlapping slightly on rose and wrap just once (to avoid bulk) with floral tape to secure.
9. Wrap remaining three petals opposite the first three. Repeat for shapes cut from filters Nos. 6, 7, and 8. Use finger and thumb to separate petals, creating air pockets and making petals curve outward from the base. Use 3 or 4 extra single petals to fill in holes and give a rounded shape.
10. To paint the roses, use watercolor paints, mixed with a bit of water. Paint the base color, first doing the bottom, then the top, working from the inside out. Accentuate with a darker color on the tips. Use a flat brush to apply a third color of undiluted watercolor to edges. Let dry overnight.
11. Once painted roses are dry, curl left and right sides of outer petals around a bamboo skewer to create a point. Work your way from the outside to the inside of rose. Curl inner petals just slightly by wrapping top straight down around bamboo skewer.
12. Add five paper sepals secured with floral tape to short stem. Wrap floral tape in a spiral down wire stem several times to create a thick roselike stem. Burnish stem with skewer to smooth tape. Cut 6 paper leaves and sandwich a 4-inch wire between. Use a glue stick to stick 6 leaves together with a 4-inch wire stem.
13. Secure leaves to stem with floral tap.

Make Recipe Books for Recipes for Mom on Mother’s Day

0 Comments


Craft metarial will be needed:
1.notebook, 8Y2 by 11 inches.
2.decorative paper.
3.2 pieces of ribbon, each 8 inches long.
4.glue.
5.colored pencil.
6.scissors.
7.tape measure.
Instructions:

Step 1

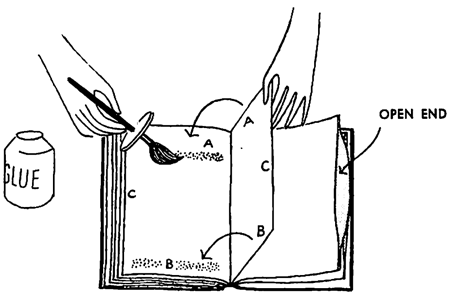
Paste two pages together on two sides (marked A and B in drawing) and leave side C open. Repeat this until you have 24
“envelopes” in the notebook. Mark each envelope with the kind of recipes to be kept there—Appetizers, Soups, Meats, Fish, Vegetables, Desserts, Drinks, Sandwiches, etc.


Step 2

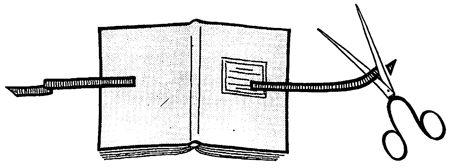
Glue the pieces of ribbon onto the center of the back and front covers of the notebook.

Step 3

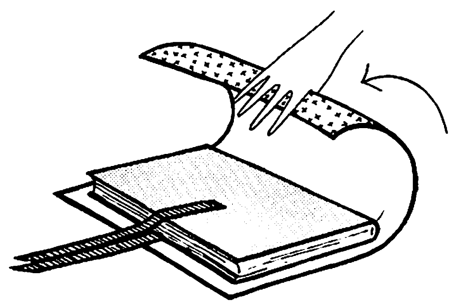
Glue decorative paper onto the covers. Cut the ends of the ribbon on the bias, to prevent fraying. You can make the same file for patterns, bills, or personal letters.

MAGAZINE HOLDER HOUSE

0 Comments

Materials :-          
1 .Ruler                                                                                                                                          
2 .Coloured markers
3 .Cardboard magazine and file storage boxes
4 .Craft or utility knife
5. Corrugated cardboard
6. Craft glue
7. Acrylic paints
8. Paintbrushes (foam brushes are handy for painting large areas)
9. Poster board or construction paper for grass and stepping-
stones                                                                                                                                                    
10. Dental floss or twine and a wide-eyed sewing needle for assembling a fence

Instruction:-
  1. step1 To construct each building, use a ruler and marker to draw rooflines, window openings, and doors on an unassembled magazine box. For variety, you can set the peak of the roof off center 2 or 3 inches as we did for some of the buildings pictured above. Cut the cardboard (a parent's job) along the lines and remove the side flap. Then assemble the box. For a long, narrow building, assemble and mark a file storage box, as shown, and cut along the lines.
  2. step2 For the roof, cut out a piece of corrugated cardboard. To figure out the dimensions, first measure the length of the upper edge of the front wall and add a couple of inches for an overhang. Then measure the width of the side wall, again adding an inch or so. Fold the cardboard to create the roof peak and glue it in place atop the building. If needed, loosely apply strips of masking tape to hold the roof in place until the glue dries.
  3. step3 Now you can paint the roofs, window trim, shutters, and doors and add any other details you desire. For example, you can glue on a cardboard steeple to create a church or fill a barn with packing-paper straw. For the finishing touches, cut out a village green from poster board or construction paper to arrange the buildings around and add paper stepping-stone paths. For a fence, cut out a bunch of small corrugated cardboard pickets and string them together with dental floss or twine.

MAKE YOUR OWN RUBBER STAMP

0 Comments

Image for Make Your Own Rubber Stamp DIY Craft Project
1.)  Plain copy paper
2.) A pencil (I used an art pencil from Faber Castell – 2B)
3.) An eraser for fixing mistakes in your drawing
4.) A thick piece of rubber or other material meant for carving stamps – I used Speedball’s Speedy-Cut…they make a pink one and a white one . The white one seems to be softer than the pink one but both cut “like butter” as it says on the packaging for many such products. )
5.) A carving tool (Mine was a set that came with 5 differently sized cutting heads – Speedball’s Lino Cut Assortment)
6.) Ink specifically for your application (fabric, paper, cardstock, etc.) – just make sure it is a thicker ink if you plan to apply it with a roller. 
7.) A piece of wood just larger than your final stamp to use as a backing

How to do it:-
1). First make a line drawing. If this is your first ever stamp-making project you might
want to keep details to a minimum and stick with thick, wide lines. This will make it easier when it’s time to carve. You can either color in the areas you plan to carve with your drawing (this will be the space that doesn’t get inked) or the areas that will print so it will look more like your final piece as your carving it – just decide ahead of time and stick with it.

2).  The Speedball material will actually pick up the outline of your drawing…no tedious tracing needed! Put your drawing face down on the material and rub the back of the paper with something hard and smooth.  Also take care not to move the drawing once you have started transferring the image.


3). Once your image is sufficiently transferred onto your rubber material, you can begin carving out the details of your drawing. I start by outlining the areas with a small tool then cutting in with the larger tools.


Carve out the parts of your image you do not want to print


4). Once you have cut out all the fine details you will need to remove the excess material from the sides so your image comes out cleanly. If you are used to creating shading and dimension in your artwork you can get a similar effect from making shallow, light, strategically placed cuts in your stamp.

5).Glue your finished stamp to the wood backing…if you don’t put a backing on it, it’s wigglyness may cause an uneven impression on your finished piece. Sometimes I get excited and skip this step, but it is the proper way to do it.


Get ready to do a test print!
Ink your rolling surface and get a good, even coating of ink on your roller. Roll the ink on to your stamp and test it on a non-essential piece of paper. You will likely see areas you need to fix in your stamp. Just cut these areas away, and test one more time before you’re ready to create you’re finished stamped piece.


Thursday, January 6, 2011

ITALIAN DOUGH RECIPE & ARRANGEMENT

0 Comments


You only need the things like:
  1. Cornflour         1/2 cup
  2. German glue or white glue      1/2 cup
  3. Water             2 tabs
  4. lemon juice1/2 tabs
  5. glycerine  1/2 tabs                                                                                                                                      
  6. non stick cooking pan
  7. Cooking oil       few drops
  8. Oil  paint colours (any colour you like.)

doo flower making
 

Method:


  1. Take a non-stick pan and mix water and glue very well.
  2. Now add the cornflour into the pan and mix it faster don't leave the spoon until the dough soft.
  3. Add lemon juice and glycerine pure in the material and and now cook it on the very little heat.
  4. Make sure, dont leave the spoon until end because its necessary.
  5. pan, yIt take maximum 3 to 4 minutes. When the dough is become thick and leave to stuck the our dough is ready.
  6. Take out the dough into a plastic bag, but grease the plastic bag with Cooking oil, Vaseline or cold cream.
  7. Now to knead ( gundhana ) the dough in the plastic bag very well until the dough getting more smooth.
  8. Let it cold in fridge for 1 day.
  9. Mix the oil paint colour in the Italian dough very well by your hands.Now your dough is ready to make flowers.
  10. Take a little piece of dough and make a plan round bread of it.Make sure that your bread should be very thin and fine.
  11. Now twist and turn round the dough bread with your fingertips and gave it a shape of rose bud.
  12. For a rose, you make 1 bud,3 small petals and 5 big petals.
  13. Attached the small 3 dough petals one by one around the rose bud by glue.
  14. Now attached 5 big petals round the small petals.now you attached all the petals to the rose, but before you dry it, attached stem into the centre of rose flower with glue. Set and twist the petals like a rose. Now let it dry.
    doo flower making
  15. Covered the stem with wrapping floral tape around it.
  16. Now make leaves from dough with the help of cutter.The colour you add the dough should be green for leaves.you also make dark and light green leaves for a natural look. You can also use artificial leaves to decorate your flowers.
  17. Then you take the rose stem and attached the leaves on it with glue and floral tape.

Now your dough flower rose stem is ready.
Other Pictures are following (Arum lily)
doo flower makingbeautiful doo flower
TIPS:
1. You can also used the food colours in the dough instead of oil paint colours and mix the colour in the dough very well by your hands. But its always good to use oil paint colour.
2. Always keep the dough in plastic bag and then REFRIGERATE it.
3. Once you made the dough,protect the dough from Air, because air will dry your dough and waste it.
4. Always take small pieces of dough for use.
5. If you follow these instructions, your Dough will soft.


CANDY PLANT FOR KIDS

0 Comments


Materials Needed:-
  • Candy Plant Craft3-inch Clay Pot
  • Paint
  • Green Floral Foam
  • Small, Wrapped Candies
  • Craft Stick
  • Misc. Supplies to Decorate
  • Craft Glue
  • Paint Brush
  • Scissors
Instructions:-
1.Paint the clay pot however you like. At this time you can also paint the craft sticks green. use however many sticks as you want flowers. Let the paint dry!
 
2.Place a snug piece of green floral foam in the pot. You can also place tissue paper in the pot first so it sticks out of the top of the pot. If you don't have floral foam, you can fill the pot with rocks or even candy!
 
3.Glue the wrapped candies one end of a craft stick. If you want 'fuller' flowers, consider cutting flower shapes out of craft foam, felt, or construction paper and gluing them to the craft stick first.


4.Poke the craft stick stems into the floral foam in the pot. Once all of your flowers are in place, you can fill in around them, covering the floral foam, with shredded tissue or Easter grass.


PATCH WORK TABLE RUNNER.

0 Comments

Required items:-

1).Printed fabric for corners,9 patch block of 5 inch square 
2).busy printed fabric for center,9 patch block of 5 inches
3).scissor
4).basic sewing supplies
5).pencil
6).matching threads.


Instruction:
This is such an easy runner to make. I'll do a tutorial here to show you just how easy lemon squeezy it is! I made this one with 27 charm squares, these ones are 5 inch squares. So lay them out into 3 groups to form a 9 patch block. Keep in mind that the squares in the corner of a 9 patch block will not be cut, so make sure that is a print you really like. The square in the middle of each 9 patch will be sliced twice, so keep that in mind too, busy prints or a neutral work best for the center square.So once you are happy with the placement, sew them into 9 patch blocks. Hopefully they will stay in order! I always seem to get one row mixed up along the way.And this is the fun part! After ironing your 9 patch block, slice it in half, rotate it and slice it again. So your block now becomes 4 blocks.After you have cut all 3 of the original 9 patch blocks together, you now need to arrange the 12 new blocks in a pleasing manner. For this one I regrouped 4 little blocks to make one big block again, so I had 3 large blocks to make the runner. I tried to have 2 little squares in the center of each block facing the same way for each of the 3 larger blocks. Does that make sense? But you could really arrange the blocks anyway you wished. That's the joy of a Disappearing 9 Patch block, it doesn't really matter!So once you have sewn all those blocks together you are on the home stretch! To make this runner just a little bit bigger and to frame it, I added a border of 1.5 inches as above.Quilt as desired. I just did a meandering stipple all over the D9P blocks and an echo stitch just inside the border. Binding is on and pinned in place ready to hand sew down for this one.

See? Easy! Let me know if you make one, love to see.


Taj Mahal Facts are :

0 Comments

The Taj Mahal is a monument of love constructed from 1632-54 at Agra in Uttar Pradesh, India, as a mausoleum for Mumtaz Mahal, the favorite wife of Shah Jahan. It was built of white marble and inlaid with semi-precious stones and elaborate mosaic work. The structure consists of a huge central dome surrounded by four smaller domes, flanked by four slim minarets. The whole is mirrored in an ornamental pool.

Wednesday, January 5, 2011

CHRISTMAS HAND MADE CARD

0 Comments

christmas-greetings
One of the first things that herald in the christmas season is greeting card. The shelves are stacked with boxes of varied, assorted and made to order cards, ready to be signed and mailed. Imagine for a moment how wonderful it would be to personalize your cards this year, and make your own card to send to those special friends and family on your list!
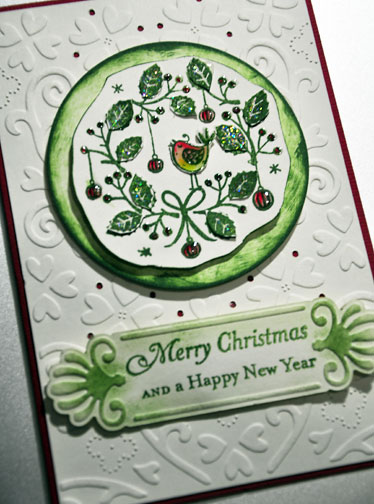
make your own card like this

handmade holiday cards .
Card making supplies used for handmade card:
  • deep christmas red color cardstock 8" x 6"
  • cream color cardstock 3.7/8" x 5.7/8"
  • cream color cardstock scraps
  • clear stamps by Penny Black
  • background embossing folder
  • label die cut and emboss folder
  • color markers or other coloring media
  • pine green ink pad
  • paper trimmer
  • scissors
  • sponge
  • double-sided foam tape
  • glossy accents
  • glue

Card making instructions:
  • Score and fold red color cardstock to make a blank 4" x 6" folded card.
  • Dry embossed background on cream 3.7/8" x 5.7/8" cardstock.
  • Layer on top of folded red card with glue.
  • Stamp Penny Black's clear stamp with pine green ink on cream cardstock scrap.
  • Color with color markers. You can also use water color or colored pencils.
  • Trim around image. Refer to photo above.
  • Cut a circle with another piece of cream cardstock and edged with pine green ink with a sponge.
  • Attach trimmed stamped image to green edged circle with double-sided foam tape.
  • Layer on top of dry embossed background cream card.
  • Die cut label on cream cardstock and dry embossed.
  • Stamp Christmas greetings with pine green ink on label.
  • Sponge pine green ink and dab lightly over embossed area and edges of label.
  • Layer on top of dry embossed background cream card just below the circle image. Refer to photo for placement.
  • Embellished with glossy accents on cherries and ornaments in stamped image.